Time for an update on my ongoing person identification in images project; for all the background you can check out these previous posts:
Analyzing AWS Rekognition Accuracy with Neo4j
AWS Rekognition Graph Analysis – Person Label Accuracy
Person Recognition: OpenCV vs. AWS Rekognition
In my earlier serverless series I discussed and provided code for getting images into S3 and processed by AWS Rekognition – including storing the Rekognition label data in DynamoDB.
This post builds on all of those concepts.
In short – I’ve been collecting comparative data on person recognition using AWS Rekognition and OpenCV and storing that data in Neo4j for analysis.
My assumption was that the trained model for person detection that ships with OpenCV was efficient enough to run “embedded”. In order to validate that I decided to run OpenCV and the person detection algorithm on a Raspberry PI located on-site. If you’ve read my earlier series of posts you know a Raspberry PI also served as a local controller node in my serverless IoT environment.
I used the following installation guide for OpenCV on a Raspberry PI to get started:
One additional note: the build takes up a lot of space – I strongly recommend you do the build on an external USB drive. It won’t be fast, but it won’t fill your root directory…
Queuing Images for OpenCV Processing
Two things were important when considering how to let the OpenCV processor know there were images to process:
- Not interfere with the work already being done in the serverless IoT system
- Not transmit the image across the internet multiple times
I solved this with two simple steps:
NAS Storage and Mapping
The first step was to ensure the second Raspberry PI had the exact same mapping to my NAS that the local controller node did. This allowed both PIs to reference the image file with the exact same path.
SQS Messaging for Files
Since the local controller node was already detecting the arrival of the file I saw no benefit in having the second PI detect the arrival event. In order to accomplish this I leveraged another AWS service – SQS.
With a minimum of code I could add the message to SQS from the IoT local controller node and receive the message on the OpenCV PI.
Code to Create the SQS Message
I modified the daemon on the IoT Controller by adding the following function:
def put_file_info_on_sqs(object_info, logger, app_config):
    # Get the service resource
    import boto3
    import json

    if object_info['img_type'] == 'snap':
        sqs = boto3.resource('sqs')

        # Get the queue
        queue = sqs.get_queue_by_name(QueueName='image_for_person_detection')
        logger.info("Putting message: {} on queue.".format(json.dumps(object_info)))
        response = queue.send_message(MessageBody=json.dumps(object_info))
    # Fin
At the appropriate time in the processing sequence I simply call this function and an SQS message is created on the named queue.
Processing Images with OpenCV
In order to process the images with OpenCV I created a daemon that would read the SQS queue and process each image. In addition the information obtained would be added to the Neo4j Graph.
Reading Message from SQS
def get_sqs_messages():
    """
    Gets messages from AWS SQS and sends them along for processing.
    :return:
    """
    # Get the service resource
    sqs = boto3.resource('sqs')

    # Get the queue
    queue = sqs.get_queue_by_name(QueueName='image_for_person_detection')

    for message in queue.receive_messages(MessageAttributeNames=['Author']):
        image_info = json.loads(message.body)
        if image_info['img_type'] == "snap":
            logger.info("Processing message (message id: {})for file: {}".format(message.message_id,
                                                                                 image_info['file_name']))
            image_info['message_id'] = message.message_id
            threading.Thread(name=('message_processor-' + message.message_id), target=process_image_message,
                             args=(image_info,)).start()
            # process_image_message(image_info)
        # FIN

        message.delete()
    # End For
# end get_sqs_messages
This code reads the message from SQS and starts a processing thread for the image.
Processing with OpenCV
The following code processes the image with OpenCV:
def detect_people(image_path):
    """
    Execution of the OpenCV person detection algorithm.
    :param image_path:
    :return:
    """
    # HOG detector config values
    image_size = get_config_item(app_config, "opencv_processing_info.image_size")
    win_stride = get_config_item(app_config, "opencv_processing_info.win_stride")
    padding = get_config_item(app_config, "opencv_processing_info.padding")
    scale = get_config_item(app_config, "opencv_processing_info.scale")

    # initialize the HOG descriptor/person detector
    hog = cv2.HOGDescriptor()
    hog.setSVMDetector(cv2.HOGDescriptor_getDefaultPeopleDetector())

    return_info = None

    image_start = time.time()
    # load the image and resize it to (1) reduce detection time
    # and (2) improve detection accuracy
    filename = image_path[image_path.rfind("/") + 1:]
    # print("[INFO] Processing file: {}".format(imagePath))
    image = cv2.imread(image_path)

    if image is not None:
        return_info = {}
        full_image = image.copy()
        scale_ratio = 1
        if image_size != 'original':
            image = imutils.resize(image, width=min(image_size, image.shape[1]))
            scale_ratio = float(full_image.shape[1]) / float(image_size)
        orig = image.copy()

        # detect people in the image
        people = hog.detectMultiScale(image, winStride=(win_stride, win_stride),
                                      padding=(padding, padding), scale=scale)

        logger.info("People detection done for image {} in {} seconds".format(
            image_path, (time.time() - image_start)
        ))

        rects = people[0]
        weights = people[1]
        return_info['rectangles'] = rects
        return_info['weights'] = weights
        return_info['image_dimensions'] = image.shape

        # draw the original bounding boxes
        for (x, y, w, h) in rects:
            cv2.rectangle(orig, (x, y), (x + w, y + h), (0, 0, 255), 2)

        # apply non-maxima suppression to the bounding boxes using a
        # fairly large overlap threshold to try to maintain overlapping
        # boxes that are still people
        rects = np.array([[x, y, x + w, y + h] for (x, y, w, h) in rects])
        pick = non_max_suppression(rects, probs=None, overlapThresh=0.65)
        return_info['number_merged_rectangles'] = len(pick)

        # draw the final bounding boxes
        for (xA, yA, xB, yB) in pick:
            xA *= scale_ratio
            yA *= scale_ratio
            xB *= scale_ratio
            yB *= scale_ratio
            cv2.rectangle(full_image, (int(xA), int(yA)), (int(xB), int(yB)), (0, 255, 0), 2)
        # End for

        if len(pick) > 0:
            # show some information on the number of bounding boxes
            logger.info("[MATCH] {}: found {} person with {} boxes returned from HOG - confidence {}".format(
                filename, len(pick), len(rects), weights))
            cv2.imwrite("/tmp/full_" + filename, full_image)
            return_info['annotated_image_file'] = "/tmp/full_" + filename
        # FIN

        return_info['processing_time'] = time.time() - image_start
        logger.info("Image processing for {} done in {} seconds".format(
            image_path, (time.time() - image_start)
        ))
    # Fin
    return return_info
This is quite a bit to digest – and I recommend you read up on OpenCV as you review this, but I’ll break it down a bit.
The first section sets the configurable values for the detector. These are loaded earlier from a configuration file. The OpenCV documentation provides excellent documentation of the configuration parameters.
We then scale the image to reduce detection time. We retain the ratio so we can later draw the detection box on the full size/resolution image.
The actual detection happens with a single line of code:
        # detect people in the image
        people = hog.detectMultiScale(image, winStride=(win_stride, win_stride),
                                      padding=(padding, padding), scale=scale)
After that we do some non-maxima suppression to merge boxes within which people are detected.
Lastly, we draw the detected box on the original scale image (by de-scaling the box), log some information and return the resulting data.
Storing the Results in Neo4j
Once the detection is complete we store the data in Neo4j for later analysis. In short, we want to generate Cypher to update the graph that looks like this:
MERGE(this_image:Image {object_key: "patrolcams/DownDownC1/2017-02-27/Hour-17/snap/SDAlarm_20170227-174726.jpg", timestamp: 1488246446}) MERGE(this_label:Label {label_name: "OpenCV Person"}) MERGE (this_image)-[:HAS_NOT_OPENCV_LABEL {confidence: [], number_found: "0", opencv_win_stride: 4, opencv_image_size: 400, opencv_padding: 32, opencv_scale: 1.05, opencv_processing_time: 2.00539588928 }]->(this_label)
This creates (or uses) the image node for the image, the label node which is the indication that OpenCV processed the image, and connects them via one of two edges:
- HAS_NOT_OPENCV_LABEL – no person detected
- HAS_OPEN_CV_LABEL – a person was detected
On that edge we put all of the current configurable values for the detector (so we can evaluate performance across configuration changes) and the processing time for the detector.
The code used to generate the cypher is:
def add_info_to_graph(image_info, person_found = True):
    """
    Adds the OpenCV output information to the local graph store for analysis
    :param image_info: The dict containing the information from the SQS message
    ;param person_found: Default True. Indicates if a person was found in the image.
    :return:
    """

    start_timing = time.time()
    logger.info("Updating the analytics graph for {}".format(image_info['s3_object']))
    s3_object = "patrolcams" + \
                '/' + image_info['camera_name'] + '/' + \
                image_info['date_string'] + '/' + \
                image_info['hour_string'] + '/' + \
                image_info['img_type'] + '/' + \
                image_info['just_file']

    add_image_node = 'MERGE(this_image:Image {object_key: "' + s3_object + '", ' + \
                     'timestamp: ' + str(image_info['utc_ts']) + '}) '
    add_label_node = 'MERGE(this_label:Label {label_name: "OpenCV Person"}) '

    increment = 0
    string_confidence_array = ""
    for confidence in image_info['opencv_person_detection_info']['weights']:
        if increment > 0:
            string_confidence_array += ","

        string_confidence_array += str(confidence[0])
        increment += 1
    # End For

    label_name = ':HAS_OPENCV_LABEL'
    if not person_found:
        label_name = ':HAS_NOT_OPENCV_LABEL'
    # Fin

    relate_image_to_label = 'MERGE (this_image)-[' + label_name + ' {confidence: [' + \
                            string_confidence_array + '], ' + \
                            'number_found: "' + \
                            str(image_info['opencv_person_detection_info']['number_merged_rectangles']) + \
                            '", opencv_win_stride: ' + str(get_config_item(app_config,
                                                                       "opencv_processing_info.win_stride")) + ', ' + \
                            'opencv_image_size: ' + str(
                                                        image_info['opencv_person_detection_info']['image_dimensions'][1]
                                                    ) + ', ' + \
                            'opencv_padding: ' + str(get_config_item(app_config,
                                                                 "opencv_processing_info.padding")) + ', ' + \
                            'opencv_scale: ' + str(get_config_item(app_config,
                                                                 "opencv_processing_info.scale")) + ', ' + \
                            'opencv_processing_time: ' + \
                            str(image_info['opencv_person_detection_info']['processing_time']) + \
                            ' }]->(this_label)'

    full_query_list = add_image_node + " " + add_label_node + " " + relate_image_to_label

    logger.info("Full Cypher Query: {}".format(full_query_list))
    neo_session = driver.session()

    tx = neo_session.begin_transaction()

    tx.run(full_query_list)

    tx.commit()
    neo_session.close()

    logger.info("Graph updated for {} in {} seconds.".format(image_info['s3_object'],
                                                             time.time() - start_timing))
    return True
Results
Over the last 30 days this setup has processed 103,137 images with OpenCV. 36,313 contained a person, 66,824 did not (at least based on the output of the detector).
Using the following cypher I’m able to see how many were processed and the average processing time per image:
match(camera:Camera)-[:HAS_IMAGE]-(image:Image)-[image_label_edge]-(label:Label) where label.label_name in['Person', 'OpenCV Person'] and image.timestamp > ((timestamp()/1000) - 60*60*24*30) return label.label_name, type(image_label_edge), count(type(image_label_edge)), avg(image_label_edge.opencv_processing_time)
This results in the following output:
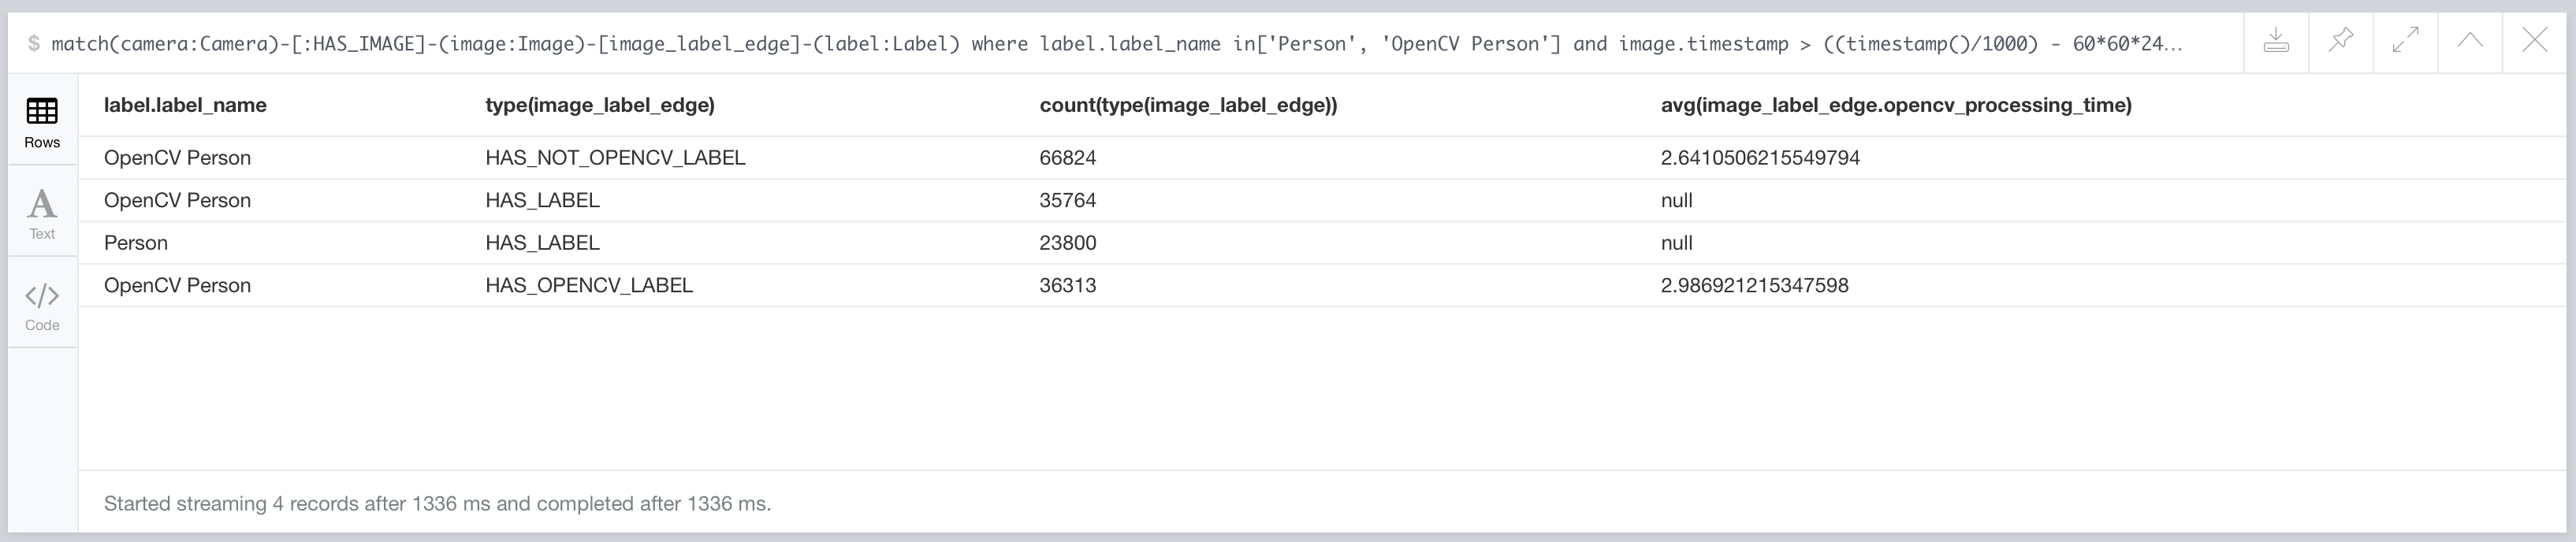
The images process in an average of ~3 seconds – which is quite good given the limited processing capacity of the Raspberry PI and the configuration set I’m using.
The line with the label_name “Person” indicates the number of images AWS Rekognition detected a person in over the same time period.
You’ll note the (very interesting) ~12,000 difference in person detection – more on that in a later post.
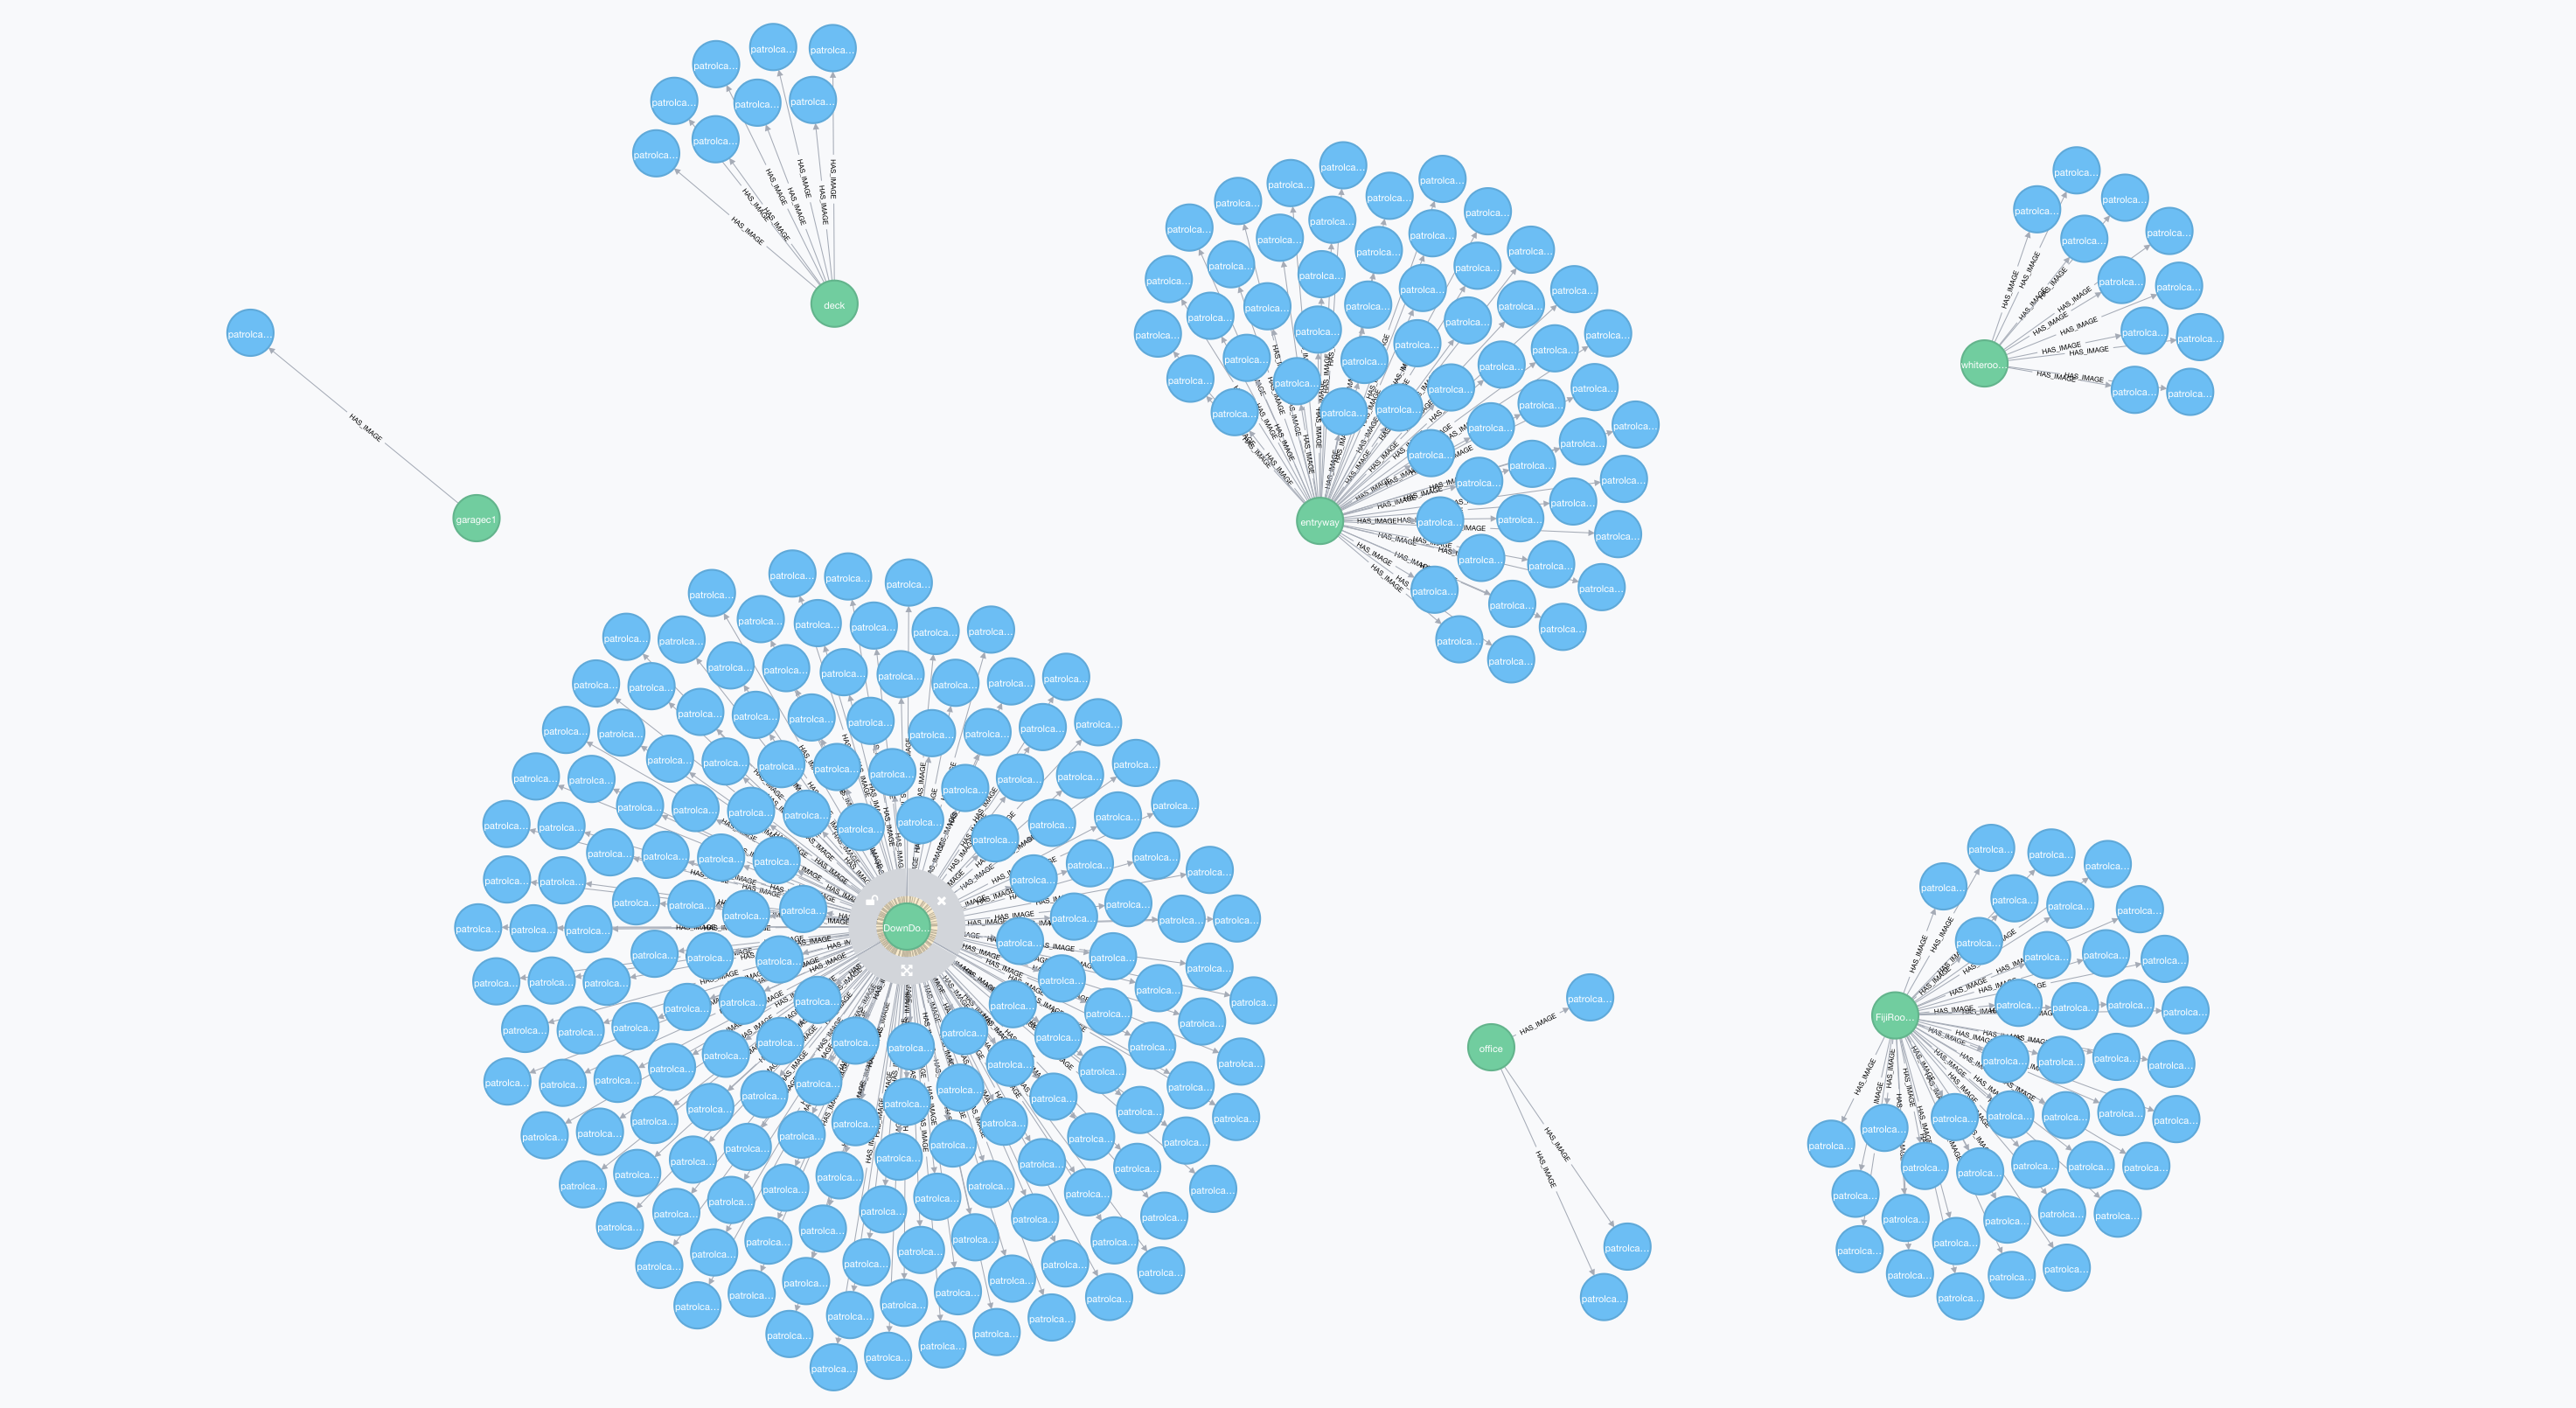
The Payoff
Since no N3o4j post is complete without some graph image eye-candy – here is a heat map of where OpenCV has detected people in the last hour:
Hey Brian!
I read all your posts about opencv and aws reko, but didnt found “your” results/toughts!!! =D
You made a good job and I appreciate if you post your results here.
Sorry about my poor english, but I learned so much from your research, that I cannot leave a “reply”.
PS: Im starting home project about face recog, and was in doubt about many options and products.